Adirondack chairs are more than outdoor seating—they are an American design icon rooted in the rugged beauty of the Adirondack Mountains of New York. First created in 1903 by Thomas Lee and later refined and patented by Harry C. Bunnell, the Adirondack chair has become a staple of patios, porches, lakesides, and backyard retreats across North America. Over time, however, even the sturdiest Adirondack chair can lose its smooth finish. Sunlight fades color. Rain raises wood grain. Seasonal expansion and contraction cause small cracks. And eventually, what once felt like polished comfort may begin to feel rough, dry, or splinter-prone. If your Adirondack chair has seen better days, refinishing it is one of the most satisfying home projects you can undertake. Done correctly, refinishing restores beauty, prevents splinters, extends lifespan, and protects your investment for years to come. This comprehensive guide will walk you step-by-step through how to refinish Adirondack chairs for a smooth, splinter-free finish—professionally, safely, and effectively.
A: Not always—strip only where paint is peeling or cracking; otherwise scuff-sand thoroughly and prime as needed.
A: Sand through a sensible grit progression, break sharp edges, and seal with a durable exterior finish.
A: Yes—use sanding blocks and flexible sanding sponges; it takes longer but can be very precise on slats and curves.
A: Clean and treat first, let dry fully, then sand—finishing over mildew can trap staining and shorten durability.
A: Paint often feels smoother and more uniform; stain can be smooth too, but prep must be extra consistent to avoid blotch.
A: It helps—coating undersides reduces moisture cycling, especially on seat slats and leg bottoms that wick water.
A: Usually dust nibs or raised grain—lightly sand, wipe clean, and add another thin coat.
A: When it’s fully cured, not just dry to the touch—give it extra time if temps are cool or humidity is high.
A: Use thin coats, maintain a wet edge, and consider a small foam roller on flats with a quick brush “tip-off.”
A: Clean seasonally, touch up chips early, and store or cover during harsh weather to reduce UV and moisture stress.
Why Refinishing Adirondack Chairs Matters
Adirondack chairs are typically made from cedar, pine, teak, eucalyptus, acacia, or high-grade hardwoods. Each of these materials reacts differently to weather, but all share one common vulnerability: exposure.
Ultraviolet rays break down surface fibers. Moisture penetrates unsealed wood. Temperature swings cause swelling and shrinking. Over time, finishes peel or wear thin, leaving raw wood exposed. When wood fibers rise and dry out, splinters form—especially along armrests, seat slats, and back supports where friction is frequent.
Refinishing does far more than improve appearance. It:
- Seals the surface against moisture
- Restores structural strength at the surface level
- Eliminates rough patches and splinter risk
- Revives color and visual depth
- Extends the lifespan of the chair
Most importantly, it brings comfort back. A properly refinished Adirondack chair should feel smooth under bare hands and legs, not rough or prickly.
Assessing the Current Condition
Before beginning, take time to carefully inspect the chair. Look for peeling paint, flaking stain, gray weathered wood, deep cracks, loose fasteners, or mold growth. Run your hand gently across surfaces to identify rough spots. If the finish is only lightly faded, a cleaning and light sanding may suffice. If paint is heavily chipped or stain has penetrated unevenly, you may need to strip the old finish completely. Structural issues such as loose screws or wobbly legs should be corrected before refinishing begins. Examine high-contact areas closely: armrests, front seat edges, and the curved back slats. These are typically where splintering begins.
Choosing the Right Refinishing Approach
There are three primary refinishing paths:
- Sand and re-stain
- Strip and repaint
- Oil and seal natural wood
The best choice depends on the chair’s current finish and the aesthetic you prefer.
If your chair was previously stained and you want to maintain visible wood grain, sanding and re-staining is ideal. If it was painted and you want bold color with maximum UV protection, repainting is best. If you prefer a natural look and have hardwood like teak, oiling and sealing may be sufficient. Whatever method you choose, the foundation of a smooth, splinter-free result is proper surface preparation.
Step One: Deep Cleaning
Before sanding or stripping, thoroughly clean the chair. Dirt and debris can interfere with sanding and finishing. Use warm water mixed with mild dish soap and a soft-bristle brush to remove surface grime. For mildew or mold, a solution of water and white vinegar works well. Avoid harsh pressure washing, which can gouge wood fibers and worsen splintering. Allow the chair to dry completely—ideally 24 to 48 hours—before moving forward.
Step Two: Disassembly (If Needed)
While not always required, partial disassembly can dramatically improve results. Removing the back slats or seat slats allows better access to tight spaces and ensures even sanding. Keep hardware organized. If screws are rusted or corroded, consider replacing them with stainless steel or coated outdoor-rated fasteners during reassembly.
Step Three: Stripping Old Finish (If Necessary)
If paint is peeling heavily or stain has built up unevenly, use a chemical stripper designed for outdoor furniture. Apply according to manufacturer instructions and allow it to soften the old finish before gently scraping it away. Choose a product safe for the specific wood species. Always work in a well-ventilated area and wear gloves and eye protection. After stripping, lightly rinse and allow the chair to dry thoroughly before sanding.
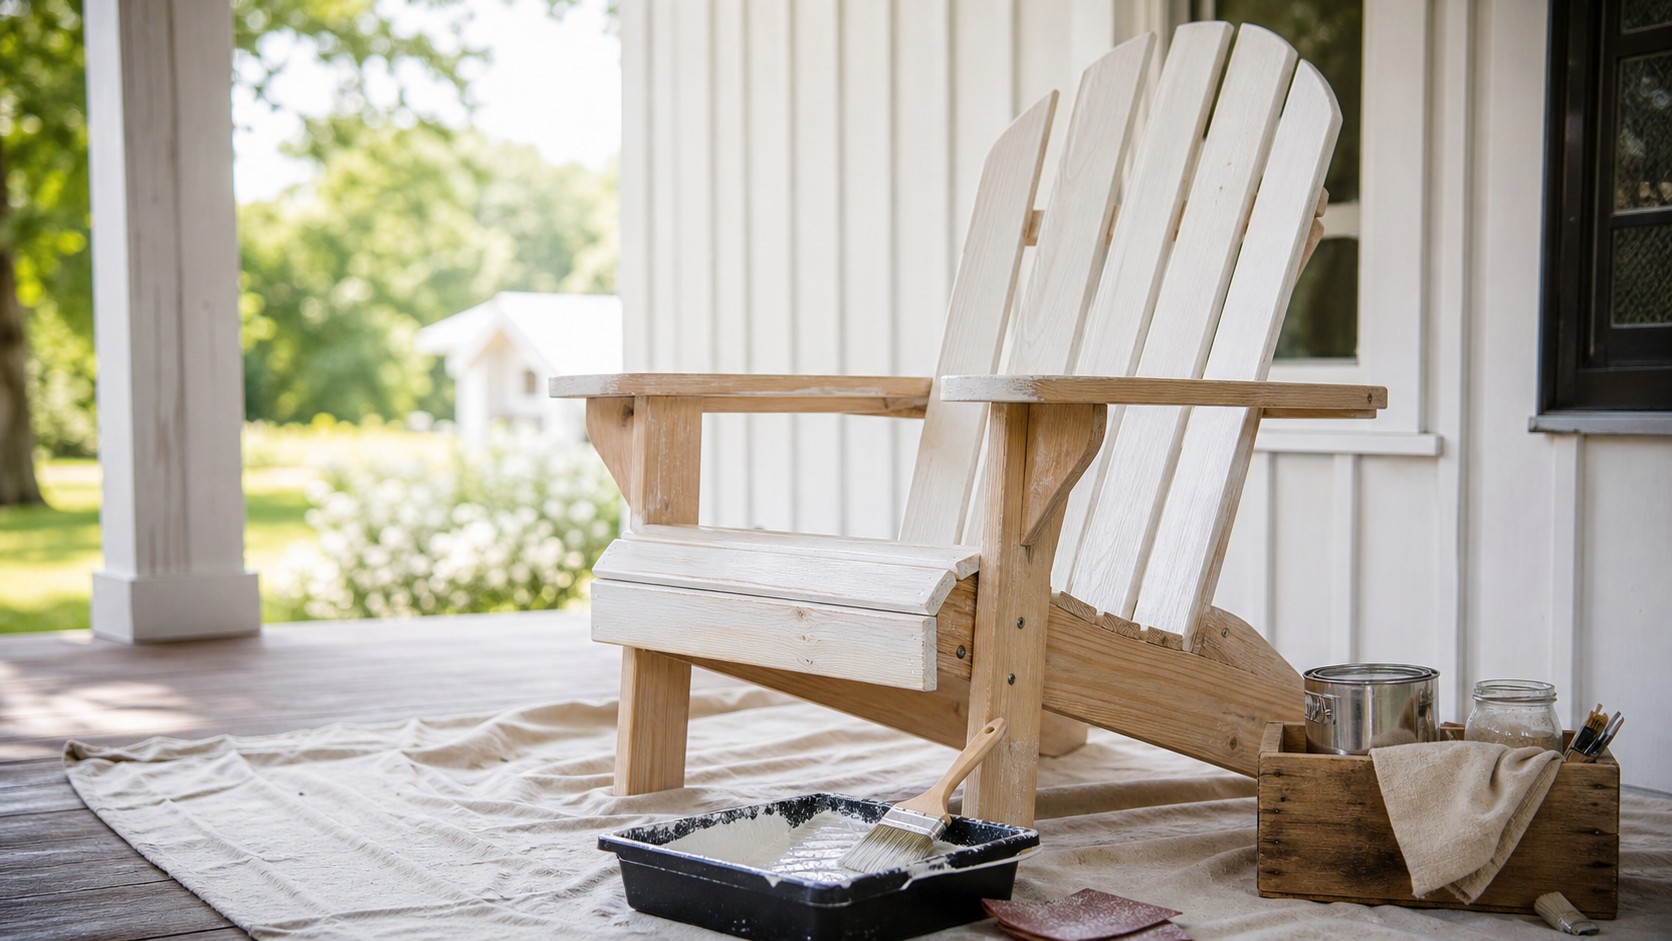
Step Four: Sanding for a Smooth, Splinter-Free Surface
Sanding is the most important step in achieving a smooth finish.
Start with medium-grit sandpaper (around 80–100 grit) to remove remaining finish and smooth rough areas. Then progress to 120 grit. Finish with fine-grit sandpaper (180–220 grit) to create a polished, touch-friendly surface.
An orbital sander works well for flat areas like armrests and seat slats. For curved back slats and tight corners, hand sanding or sanding sponges provide better control.
Always sand in the direction of the wood grain to avoid visible scratches. Pay special attention to:
- Edges of armrests
- Front seat lip
- Top of back slats
- Corners and joints
These areas often harbor micro-splinters.
After sanding, wipe down the chair with a tack cloth or damp microfiber cloth to remove dust.
Step Five: Repairing Imperfections
Inspect the sanded surface carefully. If cracks or small holes are visible, apply an exterior-grade wood filler that matches your wood tone. Allow it to dry fully before sanding smooth again. For deeper cracks, wood epoxy filler may be necessary. Addressing these imperfections prevents moisture intrusion and future splintering.
Step Six: Choosing the Right Finish
The finish you choose will determine durability and maintenance requirements.
Exterior Stain provides rich color while allowing wood grain to show. It penetrates the wood and offers moderate protection.
Exterior Paint provides strong UV protection and vibrant color options. High-quality acrylic latex paint is flexible and resists cracking.
Outdoor Oil (such as teak oil) enhances natural wood tones and offers a subtle, matte finish. However, it requires more frequent maintenance.
Marine-grade polyurethane provides a glossy, highly protective coating but may require careful application to avoid uneven buildup.
For a smooth, splinter-free surface, avoid thick, uneven coatings. Thin, even layers are key.
Step Seven: Applying Primer (For Painted Finishes)
If painting, apply a high-quality exterior primer. Primer seals wood and improves adhesion, preventing peeling. Use a brush to reach into slat corners and crevices. Allow primer to dry completely and lightly sand with fine-grit paper before applying paint.
Step Eight: Applying the Finish
Work in moderate temperatures—ideally between 50°F and 85°F. Avoid direct harsh sunlight during application.
Apply thin coats using a high-quality brush or foam applicator. Follow the grain direction. Avoid overloading the brush, which can cause drips and uneven surfaces.
Allow each coat to dry fully. Lightly sand between coats using 220 grit paper for maximum smoothness.
Typically, two to three coats produce optimal protection and finish quality.
Step Nine: Curing and Reassembly
Once the final coat is applied, allow ample curing time. Dry-to-touch does not mean fully cured. Depending on product type, curing may take several days. Reassemble any removed components carefully. Tighten hardware securely but avoid over-torquing, which can split wood.
Preventing Future Splinters
Refinishing is not a one-time event. To maintain a smooth surface:
- Clean chairs seasonally
- Inspect annually for wear
- Lightly sand rough spots early
- Reapply protective coatings as needed
Regular maintenance prevents small surface issues from becoming major refinishing projects.
Special Considerations by Wood Type
Cedar is soft and prone to splintering if neglected but sands easily.
Pine requires sealing due to its porous nature.
Teak naturally resists moisture but benefits from periodic oiling.
Hardwoods like eucalyptus and acacia require careful sanding and high-quality sealers to maintain smoothness.
Understanding your wood type ensures better long-term results.
When to Refinish Adirondack Chairs
The best time to refinish is during mild, dry weather—typically spring or early fall. Avoid humid or rainy periods, as moisture can interfere with curing.
Signs it’s time to refinish include:
- Rough texture
- Visible fading
- Peeling paint
- Gray weathering
- Small splinters forming
Acting early reduces workload and extends furniture life.
Safety and Environmental Considerations
Always work in a ventilated area. Wear dust masks while sanding. Dispose of chemical strippers and rags responsibly, especially oil-soaked materials which can pose fire risks.
Use low-VOC products when possible to reduce environmental impact.
Transforming More Than Furniture
Refinishing Adirondack chairs is about more than restoring wood. It’s about preserving a tradition of outdoor relaxation. Whether placed by a firepit, overlooking a lake, or positioned on a quiet porch, a smooth, splinter-free chair invites you to sit, unwind, and stay awhile. There is something deeply satisfying about running your hand along a freshly sanded armrest, feeling nothing but silk-like smoothness. It signals care, craftsmanship, and attention to detail. When done properly, refinishing can add years—sometimes decades—to your chairs’ lifespan. It reduces waste, saves money, and keeps well-built furniture out of landfills.
Achieving a Professional-Grade Finish
A professional result comes down to patience. Rushing sanding leads to uneven surfaces. Skipping drying times causes peeling. Applying thick coats creates drips and roughness. Take your time. Progress gradually through sanding grits. Apply thin layers. Inspect under good lighting. Run your hands across surfaces before applying each coat.
When you finish, your Adirondack chair should feel smooth in every direction. No raised grain. No hidden splinters. No rough patches at the edges. Just a comfortable, durable, beautifully restored piece of outdoor heritage.
With the right preparation and finish, your refinished Adirondack chairs will once again become the most inviting seats in your outdoor space—ready for summer sunsets, fall evenings, and years of effortless comfort ahead.
And the next time someone settles into one and comments on how smooth it feels, you’ll know that the splinter-free perfection wasn’t accidental. It was craftsmanship.